Diva Clutch Purse
Step By Step Tutorial
This cute little clutch would be great as your "go to" clutch when you don't want to carry your everyday purse for a short run to the store.
I have been making this clutch for many years and decided it was time to share.
I have put together a step by step tutorial for making one or two for yourself and maybe a friend or two.
The directions given start with a 3"x3" square, 2 different colors or 2 different prints, for a total of 12 squares per clutch.
Some things you will need:
Also your fabric choice, hook and loop tape, and a light weight fusable interfacing.
I suggest fabrics with some weight, I used cotton upholstary fabric.
These are the fabrics I chose, a floral and a stripe of the same color. Use fabrics with some weight such as upolstery fabrics. Enough to cut 6- 3"x3" squares from each. Apx. 1/4 of a yard.
Fuse the interfacing to the wrong side of each fabric.
Square off both peices of fabric by triming around all four sides with your ruler and rotery cutter. Now on the wrong side of the fabric mark for 6 -3" squares from both fabrics. Cut them out using the rotory cutter and ruler.
Your set of 6 - 3" squares per fabric.
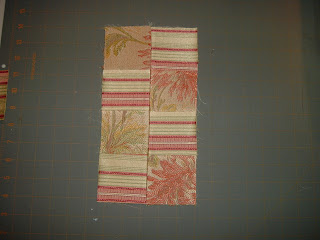
This is the fabric layout before sewing.
Sew the two middle sections together forming two strips, using a 1/4 inch seam. Press all seams open.
Now, keeping the placement, sew the two strips together lengthwise, right sides together, press seams open.
Close up view of that seam.
Should look like this after sewn and pressed.
Now sew the right and left sides together forming two separate sections.
Sew one each to the left and right of the first section, making sure to keep the layout in order. Now press these seams in the same direction away from the center sections, not an open seam. You should now have what looks like a cross.
Full view of your work from the wrong side with all seams pressed.
The right side of your work.
Fold your fabric cross in half on a diangle so it looks like this. Place it on a sheet of white paper. With a pencil trace around your folded fabric. We are now making a pattern for the lining.
After you trace around the folded fabric, darken your tracing with the marker, also add at the bottom a 1/2" seam allowance.
Make sure the pattern you just made is as acurate as possible to fit the outer section.
Cut out the pattern, pin it onto your lining fabric with right sides together. Cut 2.
NOTE: Fuse interfacing to the lining fabric before cutting out,this is for strength.
No the right side of each lining section mark with the pencil the placement for the hook and loop tape, (Velcro) this is your closer. Also fold toward the wrong side the 1/2" seam at the bottom.
Pin the lining to outer fabric with right sides together. Trim all the edges to match the outer fabric if needed.
View of the wrong side with lining pinned to other side. Lining has been trimed to match this side.
Following the dotted lines, start sewing at the black dot going up toward the top of the point, pivot, sew downward into the "V". Back stitch on both sides into the "V". This will be the center of your clutch, you want this part when turned right side out to be neat and not come apart. Sew only sections shown in diagram, leaving the left and right sides not sewn. Clip and trim before turning. Press.
After clipping, turning, and pressing this is what the above mentioned section should look like. Notice again the laft and right sides are not sewn.
Now fold the patched work which is the outside of the clutch in half right sides together, at the same time have the lining meet at the top with right sides together aswell. Pin the patched section only.
Now start sewing at the top of the point down following the arrows, off the fabric toward the clutch bottom edge. This end is sort of bulky, go slow. Back stitch. Now start sewing down toward the lining, making sure not to sew into the lining section, back stitch. Do this at both ends.
Now, follow the arrow from top of point sew down into the "V" toward the patchwork section, stop and back stitch. Start at the top again and sew down and off to end, back stitch.
Turn both patchwork and lining so right sides of both are shown. Press the patchwork points on the left and right. Don't press the lining at sides but, do press the lining bottom to prepare it for closing. Pin it and sew closed.
Push the lining inside and press all around to flatten and crisp corners.
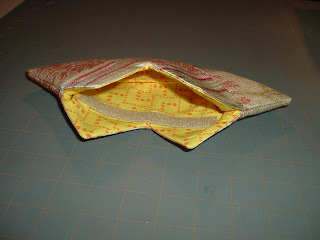
Here is your finished "Diva Clutch". Enjoy!


Please post your comments and a photo of the Diva Clutch if you made one.
ReplyDelete