Follow Me on Pinterest

Sunday, November 13, 2022


                                                       Bead Box 


Everything you see here is in the box, it's about 18 to 20 bags of beads and findings plus a strip of silk or cotton fabric, and a faux leather 5x5 square. Everything in the box is useable including the box all this comes in. Mix and match with what you have in your stash and make some wonderful creations. Enjoy.  No subscription, just buy a box or two, they are all random, no two alike.


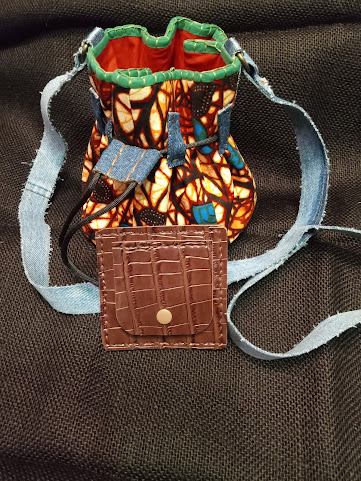
 This small bucket bag will carry your phone, some cash in the wallet that comes with the bag and a few more things. African fabric gives it a pop of color and the denim gives it that grab and go look.

If interested contact me at sharon.wilkerson51@yahoo.com  to discuss particulars.

Coaster / Black Lettering White Background 


Sunday, January 6, 2013


3 Small Gift Boxes From One 12 x 12 Scrap booking Sheet, Card Stock


The above diagram shows how to prepare your paper to make your 3 Gift Boxes.

First, divide the sheet into 3 equal sections 4" wide. This is shown by the thick black lines.

Second, divide each of the 4 sections into 3 separate sections each.
Starting from left to right, the first section of the 4" space is 1", then the next 2 sections are 1 1/2" each. This is shown by the dotted lines.

Now, indicated by the red lines divide your paper into 8 equal sections, 1 1/2" each. These are your fold lines.

When you make these boxes the first time as a test, use a pencil to draw the lines. When you are making them to use for gifts use a scoring tool to make all the lines. You don't want pencil lines on the inside of your finished boxes.

The above diagram shows how to separate your paper into the 3 gift boxes. Once you have cut the three 4" sections apart, it's time to form your gift boxes.

The top portion that's shaded gray gets cut off, toss it you won't need it. 

Now fold all the red lines on all three 4" sections. Next, cut with a craft knife or a pair of scissors from right side of each 4" section up to the first dotted line, no farther. This forms the bottom. 

On the 1" dotted line I have added a bold black line, notice where these lines are. Use a craft knife and cut those lines only. This forms your closure and handle.

Now glue one of the 1 1/2" sections on top of the one at the other end to form an hexagon.

Place the hexagon on your table with the bottom section facing upward. Fold all the tabs inward and tape in place. To make this step easier place your box onto a small food can or anything that will give you a flat surface inside the box. Use a small piece of tape to keep them in place.

Now cut out a circle and glue it to the outside bottom, you can also do this to the inside too if you like. The circle covers the tape and gives the box a finished look.

Oh, I almost forgot. Punch a hole in the middle of each 1" section on the fold, this is for the ribbon tie.

To form the handle push the middle where you punched the ribbon hole inward.


This is what your box will look like when finished.


This photo shows the punched hole in the handle for the ribbon tie.


This photo shows the handle pushed in after your gift has been placed inside the box.


Top view of box with tie. Place a small piece of tissue paper in the box first just to cover the bottom, then put your gift inside, push the two sides inward and add the tie. Very cute.


The finished boxes are 2 1/2" high by 3" wide.

These are great for small gifts, Easter baskets, and party favors.

Comments are welcome.


Sunday, November 25, 2012


Bracelet Cup Package
I'm always looking for a new way to show off the jewelry I make with buy appeal, this is my latest idea. It shows off the colors of the jewelry and makes passers by say " oooh, what is that"?
This is the bracelet I will package today.
The above photo shows a medium size condiment cup with a lid, it's about 2 1/2" diamitor. Punch two holes in the lid indicated by the black dots .

Cut a length of ribbon or cord 9" long, thread it through the two holes and tie a bow to the outside of the lid. Set aside.
Take a small amount of cellophane, about 2" wide and 15" long and crumple it into a wad and place it inside the cup. This keeps the jewelry still and will make it looks as though it's floating.
Now place your jewelry/bracelet on top of the cellophane, than put the lid with the bow onto the cup. It's real pretty, give it a try.

You can even put this inside a small box if you want to gift wrap this package.


Tuesday, October 30, 2012

Diva Clutch Purse
Step By Step Tutorial


This cute little clutch would be great as your "go to" clutch when you don't want to carry your everyday purse for a short run to the store.

I have been making this clutch for many years and decided it was time to share.

I have put together a step by step tutorial for making one or two for yourself and maybe a friend or two.

The directions given start with a 3"x3" square, 2 different colors or 2 different prints, for a total of 12 squares per clutch.

Some things you will need:


Also your fabric choice, hook and loop tape, and a light weight fusable interfacing.
I suggest fabrics with some weight, I used cotton upholstary fabric.

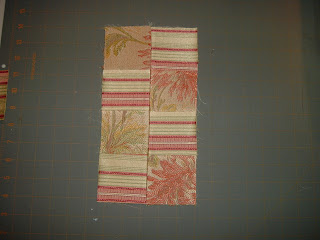
These are the fabrics I chose, a floral and a stripe of the same color. Use fabrics with some weight such as upolstery fabrics. Enough to cut 6- 3"x3" squares from each. Apx. 1/4 of a yard.
Fuse the interfacing to the wrong side of each fabric.
Square off both peices of fabric by triming around all four sides with your ruler and rotery cutter. Now on the wrong side of the fabric mark for 6 -3" squares from both fabrics. Cut them out using the rotory cutter and ruler.
Your set of 6 - 3" squares per fabric.
This is the fabric layout before sewing.
Sew the two middle sections together forming two strips, using a 1/4 inch seam. Press all seams open.
Now, keeping the placement, sew the two strips together lengthwise, right sides together, press seams open.
Close up view of that seam.
Should look like this after sewn and pressed.
Now sew the right and left sides together forming two separate sections.
Sew one each to the left and right of the first section, making sure to keep the layout in order. Now press these seams in the same direction away from the center sections, not an open seam. You should now have what looks like a cross.
Full view of your work from the wrong side with all seams pressed.
The right side of your work.
Fold your fabric cross in half on a diangle so it looks like this. Place it on a sheet of white paper. With a pencil trace around your folded fabric. We are now making a pattern for the lining.
After you trace around the folded fabric, darken your tracing with the marker, also add at the bottom a 1/2" seam allowance.
Make sure the pattern you just made is as acurate as possible to fit the outer section.
Cut out the pattern, pin it onto your lining fabric with right sides together. Cut 2.
NOTE: Fuse interfacing to the lining fabric before cutting out,this is for strength.
No the right side of each lining section mark with the pencil the placement for the hook and loop tape, (Velcro) this is your closer. Also fold toward the wrong side the 1/2" seam at the bottom.
Pin the lining to outer fabric with right sides together. Trim all the edges to match the outer fabric if needed.
View of the wrong side with lining pinned to other side. Lining has been trimed to match this side.

Following the dotted lines, start sewing at the black dot going up toward the top of the point, pivot, sew downward into the "V". Back stitch on both sides into the "V". This will be the center of your clutch, you want this part when turned right side out to be neat and not come apart. Sew only sections shown in diagram, leaving the left and right sides not sewn. Clip and trim before turning. Press.

After clipping, turning, and pressing this is what the above mentioned section should look like. Notice again the laft and right sides are not sewn.

Now fold the patched work which is the outside of the clutch in half right sides together, at the same time have the lining meet at the top with right sides together aswell. Pin the patched section only.

Now start sewing at the top of the point down following the arrows, off the fabric toward the clutch bottom edge. This end is sort of bulky, go slow. Back stitch. Now start sewing down toward the lining, making sure not to sew into the lining section, back stitch. Do this at both ends.
Now, follow the arrow from top of point sew down into the "V" toward the patchwork section, stop and back stitch. Start at the top again and sew down and off to end, back stitch.

Turn both patchwork and lining so right sides of both are shown. Press the patchwork points on the left and right. Don't press the lining at sides but, do press the lining bottom to prepare it for closing. Pin it and sew closed.

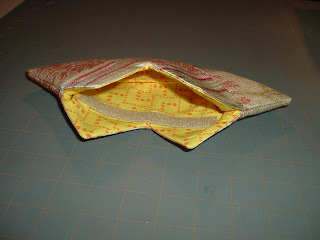
Push the lining inside and press all around to flatten and crisp corners.


Here is your finished "Diva Clutch". Enjoy!


Wednesday, October 24, 2012


Paper Plates
That’s what I said, Paper Plates.
These plates have a core of paper that's covered with vibrant fabrics. Use them to hold mail, change and keys from your pockets, an in-out tray on your desk, etc. They also function great as wall hangings. The possibilities for these plates are up to you.

Care for the plates should be confined to a dry, dry dust cloth. Treat them the same as you would a fine work of art. Donot put in dishwasher or get them wet. These plates are strictly decorator items. 


Bold floral with green border, the bottom is red.

 Green and blue stripe with light green trim with royal blue bottom.

Natural color burlap top and bottom with cotton cutout embelishment. 

Blue and gray batik cotton with gold leaf, leafs on the outer edge and leaf edge trim. Has a royal blue bottom.